Push setup
Setting up the Push
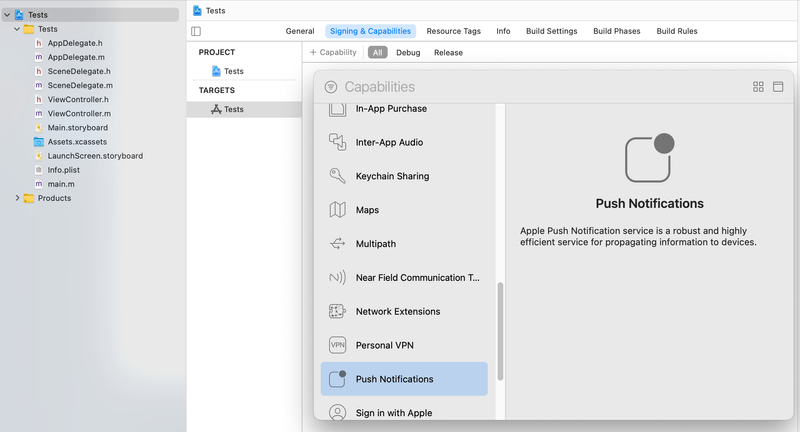
First of all, open your project in Xcode by clicking on it in the sidebar, then click on the Signing & Capabilities tab.
If Push Notifications isn't already there, click on + Capability and pick Push Notifications. If there is a Fix button shown, press it.
Then, you need to add a few lines to your app delegate in order to receive push notifications.
- Swift
- Objective-C
import Batch

func application(_ application: UIApplication, didFinishLaunchingWithOptions launchOptions: [UIApplicationLaunchOptionsKey: Any]?) -> Bool {
    // Start Batch.
    BatchSDK.start(withAPIKey: "YOUR_API_KEY")

    // Ask for the permission to display notifications
    // The push token will automatically be fetched by the SDK
    BatchPush.requestNotificationAuthorization()

    // Alternatively, you can call requestNotificationAuthorization later
    // But, you should always refresh your token on each application start
    // This will make sure that even if your user's token changes, you still get notifications
    // BatchPush.refreshToken();

    // Sets Batch as your UNUserNotificationCenterDelegate.
    // This will disable the legacy callbacks on your app delegate (didReceiveRemoteNotification, ...).
    // If you rely on those, do not add this line and please consider migrating to the UserNotification framework.
    //
    // If you already have a UNUserNotificationCenterDelegate implementation, do not add this line.
    // Instead, add Batch's callbacks in your implementation. See 'Advanced > Intercepting notifications',
    BatchUNUserNotificationCenterDelegate.registerAsDelegate()

    return true
}
Note: If you already implement a UNUserNotificationCenterDelegate class, please read the intercepting notifications documentation to properly integrate Batch into it.
Requesting notification permission
To ask for the permission to display notifications and register the current device for push you can use one of the following APIs:
- Swift
- Objective-C
    // Ask for the permission to display notifications
    // The push token will automatically be fetched by the SDK
    BatchPush.requestNotificationAuthorization()

    // Ask for the permission to display notifications with a completion handler.
    // The push token will automatically be fetched by the SDK
    BatchPush.requestNotificationAuthorization { success, error in
      // Handle permission result
    }

    // Ask for the provisionnal permission to display notifications
    // Notifications will NOT be displayed on the lock screen, or as a banner when the phone is unlocked.
    // They will directly be sent to the notification center, accessible when the user swipes up on the lockscreen, or down
    // The push token will automatically be fetched by the SDK.
    BatchPush.requestProvisionalNotificationAuthorization()
Note: It's preferable to make the request in a context that helps people understand why your app needs authorization.
Your first notification
1. Obtaining your device token
You can find your device's token using the debug tool or locating the token Batch posts to the Xcode console:
[Batch] - Push token (Apple Push Production): <push token>Based on your Provisioning Profile, the token shown in the console will be Development ("Sandbox/Development") or Production ("Production").
If you don't see a push token, there might be an error in the logs describing what happened. See our troubleshooting documentation for more info.
Note: Push notifications in an iOS Simulator are only supported when using an iOS 16 or higher simulator on macOS 13 on a T2 or Apple Silicon mac. Older simulators, macOS versions or computers do not support Push in the simulator: please use a physical device.
2. Obtaining your Installation ID
You can then retrieve the Installation ID, which represents an installation of your app on a device, by calling the following methods:
- Swift
- Objective-C
BatchUser.installationID()While Batch prints this in the debug console on start, displaying it in a settings or about page enables users to send you this identifier. This is useful for debugging, sending test notifications, etc.
3. Sending a test push notification
Batch enables you to send a test notification to the application installation currently running on your device.
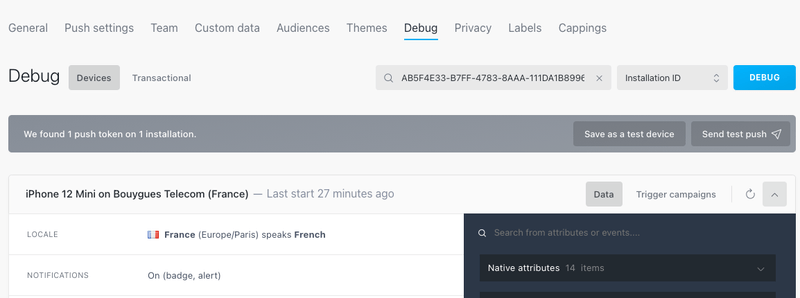
To do so, open the dashboard and go to ⚙ Settings → Debug. Enter your Installation ID, hit Debug and then click on "Send Test Push".
You should receive a notification on your device. If not, or if you can't find your Installation ID, the SDK might not be properly configured.
If you need to send push notifications to your device on a regular basis, then you should add your ID as a test device by clicking the "Save as a test device" button.
Troubleshooting
If you're having trouble sending test notifications, you can check our troubleshooting documentation.
What's next
Congratulations on finishing the integration of Batch Push!
Here are a couple of extra steps you can take before releasing your app:
- Live API key: Ensure you don't use Batch's DEV API key in the build you will upload to the AppStore.
- Rich notifications: Add support for iOS 10 rich push notifications.
- Mobile Landings: Make sure Mobile Landings are set up correctly.
- Custom user identifier: Add support for custom user identifiers if you are planning to use the Transactional or the Custom Data APIs.
- Analytics: Add an event dispatcher to automatically track your campaigns in your third-party analytics tool.
- Universal Links: Declare your Universal Links domains to Batch to open then inside of your app.
- Token import: Import your existing tokens if you're coming from another push provider.

