SDK integration
This guide assumes that you've already followed the iOS and Android prerequisites.
Installation
batch_flutter requires Flutter 2.0 and Dart 2.12 or higher. Flutter 3 is supported.
flutter pub add batch_flutterSetting up the plugin
Batch requires that the native projects are modified to configure the plugin.
This is required as Android and iOS might kill your applications process only to launch it at a later date to handle background tasks, such as displaying a notification. Integrating natively allows Batch to work even if the Flutter engine is not started.
Before proceeding, you will need your Batch API keys. In the following documentation samples YOUR_BATCH_API_KEY should be replaced with your Batch Dev or Live API key. You'll find the API keys needed to set up the SDK in Settings → General:
- Dev API key: Use it for development or testing purposes. This API key won't trigger stats computation. Please take care not to ship an app on a Store with this API key.
- Live API key: Should be used in a production environment only and in the final version of your app on the Store.
Note that you should not use the same API key for iOS and Android.
If you created different apps on the Batch dashboard for testing purposes, you can use the Live Api Key.
Android
Adding Firebase Cloud Messaging
Batch requires Firebase Cloud Messaging (FCM) for push to be enabled. It can be added using a Flutter plugin, or natively in the Android project by following Firebase's native FCM documentation.
Adding Huawei Push (Optional)
Batch supports notifications using Huawei Mobile Services (HMS) for devices that don't support Play Services.
If you require this, please follow the native Android Huawei documentation.
Setting up a custom application class
If you already have a custom android.app.Application subclass registered, you can skip this step.
Open your project's Android folder in Android Studio.
First, create a new class that subclasses android.app.Application. It can be named however you want, but we will call it ExampleApplication for the sake of this example.
Place it in your root package.
Then, add an onCreate() override. The class should look like this:
- Kotlin
- Java
import android.app.Application

class ExampleApplication: Application() {
    override fun onCreate() {
        super.onCreate()
    }
}
Finally, open your AndroidManifest.xml and find the application tag.
In it, add an android:name attribute, and set the value to your class' name, prefixed by a dot (.).
<manifest xmlns:android="http://schemas.android.com/apk/res/android"
    package="com.batch.batch_flutter_example">
   <application
        android:name=".ExampleApplication" >
Enabling the plugin
In your Application subclass' onCreate() method, call BatchFlutterPlugin.setup(this).
Example:
- Kotlin
- Java
import android.app.Application
import com.batch.batch_flutter.BatchFlutterPlugin

class ExampleApplication: Application() {
    override fun onCreate() {
        super.onCreate()
        // Configuration can also be provided as metadata in AndroidManifest.xml. This will be explained
        // in the documentation's next steps.
        BatchFlutterPlugin.getConfiguration(this)
                .setAPIKey("YOUR_API_KEY")
        BatchFlutterPlugin.setup(this)
    }
}
iOS
Run flutter build ios --no-codesign after adding the plugin to your pubspec to initialize the native dependency.
Minimum iOS version
Default iOS Flutter projects can run on iOS 9.0 or higher. However, Batch requires iOS 10.
This can lead to the following error when flutter build ios is ran:
Specs satisfying the `batch_flutter (from `.symlinks/plugins/batch_flutter/ios`)`
dependency were found, but they required a higher minimum deployment target.
To fix this, you need to make your application require iOS 10 or higher:
- Open
ios/Podfileand addplatform :ios, '10.0'at the beginning of the file.
Make sure you do not have any other line starting withplatform :ios.
If your app should require an higher iOS version, replace10.0with your minimum OS version. - Update the iOS deployment target in the Xcode project.
This can be done later, as this will only produce a warning for now, but it must be fixed before submitting to the store.
Enable Push Capabilities
Open the xcworkspace in the ios/ folder. In the project window:
- Select your project in the sidebar
- Go to
Signing & Capabilities - Press on
+ Capability - Add
Push Notifications
Modifying the AppDelegate
Open AppDelegate.swift (or .m if you have an Objective-C plugin). In it:
- Import the
Batchandbatch_fluttermodules. - Inside of
didFinishLaunchingWithOptions:- Add
BatchUNUserNotificationCenterDelegate.registerAsDelegate()if you do not already have a customUNUserNotificationCenterDelegate. If you do, please follow this documentation. - Call
BatchFlutterPlugin.setup(). - Call
BatchPush.refreshToken().
- Add
Here is an example Swift implementation of the AppDelegate:
import UIKit
import Flutter
import batch_flutter
import Batch

@UIApplicationMain
@objc class AppDelegate: FlutterAppDelegate {
  override func application(
    _ application: UIApplication,
    didFinishLaunchingWithOptions launchOptions: [UIApplication.LaunchOptionsKey: Any]?
  ) -> Bool {
    GeneratedPluginRegistrant.register(with: self)

    // If you already have a UNUserNotificationCenterDelegate, please follow
    // https://doc.batch.com/ios/advanced/intercepting-notifications#ios-10
    // to integrate Batch in it.
    // Note that as a result, changing the value of`BatchPush.showsiOSForegroundNotifications`
    // won't have any effect.
    BatchUNUserNotificationCenterDelegate.registerAsDelegate()
    // API Key can also be configured in the Info.plist. This will be explained
    // in the documentation's next steps.
    BatchFlutterPlugin.configuration.APIKey = "YOUR_API_KEY"
    BatchFlutterPlugin.setup()
    BatchPush.refreshToken()

    return super.application(application, didFinishLaunchingWithOptions: launchOptions)
  }
}
Rich notifications
Rich notifications require setting up a Notification Service Extension. Please follow the native Rich notifications setup documentation.
Note: Due to a Flutter bug, we advise using CocoaPods to add
BatchExtensionrather than SPM. If you're getting an error saying "Packages are not supported when using legacy build locations, but the current project has them enabled", this might be the underlying issue.
Configuring the plugin
As shown by the examples earlier, the plugin needs to be configured with the API Key.
There are two ways to do so:
- Code configuration, in your
Applicationsubclass on Android, Application delegate on iOS. - Static configuration, using
AndroidManifest.xmlon Android,Info.pliston iOS.
Not configuring an API key will result in any batch_flutter dart method call to throw an exception.
Android
Code based configuration should be done in your Application subclass, right before BatchFlutterPlugin.setup: configuration changes made after calling this method will not be applied.
Call BatchFlutterPlugin.getConfiguration(this) to get the configuration object, which can be used as a builder. Changes will automatically be saved.
Example:
- Kotlin
- Java
BatchFlutterPlugin.getConfiguration(this)
                .setAPIKey("YOUR_API_KEY")
The following methods are available:
setAPIKey: Batch API Key.setCanUseAdvancedDeviceInformation: Enable usage of advanced device information. See Android -> Custom data -> Advanced for more info. Default: true.setInitialDoNotDisturbState: Enables Do Not Disturb by default. Default: false.
Note: if you call
getConfigurationand have also configured the plugin using the manifest, the object's default values will mirror your manifest values.
Manifest configuration automatically looks for the following keys:
com.batch.flutter.apikey: Batch API Key.com.batch.flutter.use_advanced_device_information: Enable usage of advanced device information. See Android -> Custom data -> Advanced for more info. Default: true.com.batch.flutter.do_not_disturb_initial_state: Enables Do Not Disturb by default. Default: false.
Boolean keys should be set as "true"/"false".
iOS
Code based configuration should be done in your application delegate class, right before BatchFlutterPlugin.setup: configuration changes made after calling this method will not be applied.
Call BatchFlutterPlugin.configuration to get the configuration object. Changes will automatically be saved.
Example:
BatchFlutterPlugin.configuration.APIKey = "YOUR_API_KEY"The following properties can be used to configure the plugin:
APIKey(string): Batch API Key.canUseAdvancedDeviceInformation(boolean): Enable usage of advanced device information. See iOS -> Custom data -> Advanced for more info. Default: true.initialDoNotDisturbState(boolean): Enables Do Not Disturb by default. Default: false.
Note: if you call
configurationand have also configured the plugin using the Info.plist, the object's default values will mirror your manifest values.
Info.plist-based configuration looks for the following keys:
BatchFlutterAPIKey(string): Batch API Key.BatchFlutterCanUseAdvancedDeviceInformation(boolean): Enable usage of advanced device information. See iOS -> Custom data -> Advanced for more info. Default: true.BatchFlutterDoNotDisturbInitialState(boolean): Enables Do Not Disturb by default. Default: false.
Asking for the permission to display notifications
On iOS and Android (13+), your app needs to request for the permission to display notifications.
This is done on the Flutter side of the app, as it can be asked as a step of an onboarding.
Once the user consents, the push token will automatically be fetched by the SDK.
This can be done using BatchPush.instance.requestNotificationAuthorization():
import 'package:batch_flutter/batch_push.dart';

@override
Widget build(BuildContext context) {
  return ElevatedButton(
        child: Text("Request notification permission"),
        onPressed: () =>
            BatchPush.instance.requestNotificationAuthorization(),
      )
}
Your first notification
You can now build and launch your application! Batch should automatically start.
We can now display a test push notification.
1. Obtaining Your Device Token on iOS
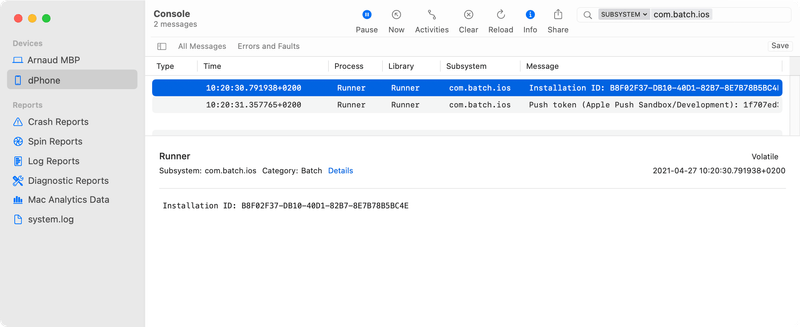
You can find your device's token using the debug tool or locating the token Batch posts to the Xcode console:
Installation ID: <Installation ID>
Push token (Apple Push Production): <push token>
Based on your Provisioning Profile, the token shown in the console will be Development ("Sandbox/Development") or Production ("Production").
If you're not running your Flutter application using Xcode, you can find the logs in macOS' Console app. Filter using the com.batch.ios subsystem.
Note: Flutter will show Batch's logs in your IDE, but might miss early logs (such as the Installation ID).
2. Obtaining Your Device Token on Android
You can find your device's token using the debug tool or locating the token Batch posts to the logcat (see here to know more):
Batch   : Installation ID: <Installation ID>
Batch.Push: Registration ID/Push Token (FCM): <your device token>
3. Sending A Test Push
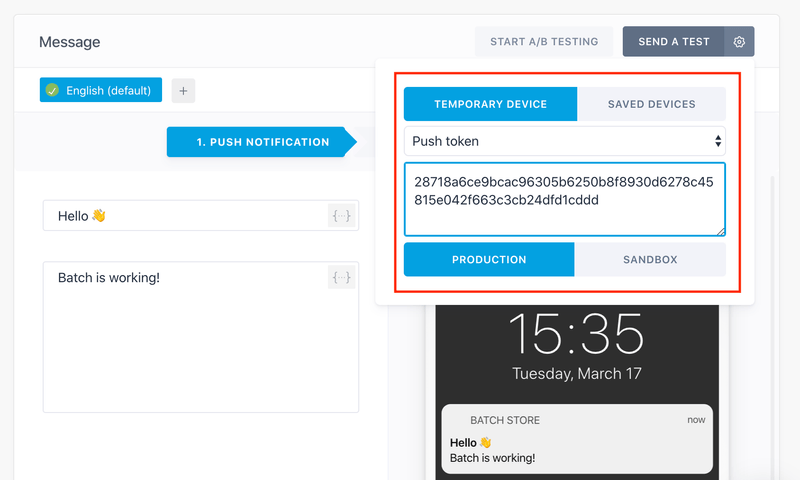
You can send test notifications to your device with a push token. In the push notification creation form, click the ⚙️ and copy your push token in the corresponding field. Hit "Send a test".
What's next
Congratulations on finishing the integration of Batch Push!
Here are a couple of extra steps you can take before releasing your app:
- Live API key: Ensure you don't use Batch's DEV API key in the build you will upload to the App Store / Play Store.
- Small icon / Accent color: Make sure the small icon you are using is opaque white. We also recommend you use an accent color. You will find more information here.
- Analytics: Add an event dispatcher to automatically track your campaigns in your third-party analytics tool.

